What is the Theater?

NBA 2K23 featured 24/7 matchmaking for the first time ever in the Old Gym, and while that specific game mode has been taken out of the game, a new version has been released in NBA 2K23: the Theater.

The Theater is another 24/7 matchmaking mode with a bit of a twist. Whereas the Old Gym was 3v3 random matchmaking, the Theater has several different game modes.

Theater Game Modes

For example, the first week was 2v2 “No Squads”, 2v2 Squads with bonus points for alley oops, 3v3 with Bonus points for assists, and 4v4. Four different game modes, four different themes.

We expect to see much of the same as the year progresses. Four different game modes, ranging from 1v1 to 5v5, all to 21, with matchmaking. It is unknown how often the events are updated, but there seems to be a mode for everyone.

This game mode has been an awesome upgrade over the Old Gym, and will continue to be so. Whether you have a squad or not, want to get away from the sweats in the Park, or just want instant games, the Theater is open.

Rep in the Theater

You do get park rep in the Theater, although it is lower than playing in your own park affiliation. The games also count towards your park record, although you will not see any progress in your GOAT levels.

The one advantage, at least rep-wise, is that you can get games quickly without a squad. You can play whenever and rack up the rep needed to reach level 40.

What are Core Badges?

Core badges are a new part of the NBA 2K23 badge system that allows you to equip top-tier badges without using badge points. In this post we break down the specifics of this new system and how you can benefit from it.

Quick Breakdown of the Badge System

As of now, the badge system is broken into three tiers for each badge category – Tier 1, 2, and 3. Tier 3 badges are considered the best, while Tier 1 badges are considered the worst. These tiers are dependent on height.

Tier 1 badges cost 1-2-3-4 badge points from Bronze to Hall of Fame, Tier 2 badges cost 3-4-5-6 from Bronze to HOF, and Tier 3 badges require 5-6-7-8 badge points from Bronze to HOF.

You must also equip 10 badge points from Tiers 1 and 2 (the two lowest) before equipping a Tier 3 badge. Thus, you would need at least 18 badge points to get a Tier 3 HOF badge.

How a Core Badge Fits into this System

Once you equip your first Tier 3 badge, a ‘Core Challenge’ will start. These challenges are dependent on the badge, for example, the Core Challenge for Rebound Chaser would be focused on grabbing rebounds.

Once you complete the Core Challenge, you can equip the badge as a “Core Badge,” and the cost of the badge does not count against your badge points. This means that, if you have 18 badge points, you can have one HOF Tier 3 Core badge and another HOF Tier 3 badge.

You get one Core badge per category (Finishing, Shooting, so on), which can be from any tier. Of course, you will want most of them to be from Tier 3, but sometimes you may have to settle for a lesser badge.

The Core badge system is a great idea in that badges are very expensive this year, and this allows you to, at least, get another important badge at no cost. And the progress on any level, say from Bronze, carries over to higher levels as you unlock them.

Which Badges should I make my Core Badges

Obviously this depends on your position and how you play, but here are our recommendations for each position on which are the best badges to make your Core badges:

Guards

  • Finishing: Posterizer or Limitless Takeoff
  • Shooting: Limitless Range
  • Playmaking: Killer Combos or Handles for Days
  • Defense: Clamps

Swings

  • Finishing: Posterizer or Limitless Takeoff
  • Shooting: Catch and Shoot
  • Playmaking: Clamp Breaker
  • Defense: Clamps

Big Men

  • Finishing: Bully
  • Shooting: Catch and Shoot
  • Playmaking: Break Starter
  • Defense: Anchor or Rebound Chaser

Jumpshot Database

2K killed it with the jumpshots this year, updating a lot of players to their real-life animations. In addition, they added a series of attributes to each jumpshot, which determine their effectiveness. Here is a description of each attribute:

  • Shot Speed: How quickly the shot gets to its ideal release point.
  • Release Height: How high the shot is released.
  • Defensive Immunity: How effective the shot is against defensive contests.
  • Timing Impact: Adjusts shot windows to reward good timing at the cost of an increased penalty for bad timing.

For each category below, we match the jumpshot with a) the minimum 3pt rating needed to unlock the jumpshot, and b) the attributes for each jumpshot:

Guards

JumpshotMin 3PT RatingRelease HeightRelease SpeedDef. ImmunityTiming Impact
Nickeil Walker-Alexander63C+B-C-D-
Grayson Allen78DBB+B+
Cole Anthony63D+B+BC+
Ryan Archidiacono77B-A-B+C`
DJ Augustin79B-DAA+
Lamelo Ball80BA+B+C
Lonzo Ball77C-C+B+B+
Dalano Banton72B+B+B-D+
Dick Barnett77D+D-A+A+
Kent Bazemore67CB+C+D-
Bradley Beal81BCAA-
Malik Beasley74BC-A-C+
Patrick Beverley55B-C-D-D-
Eric Bledsoe71B+D-B+B-
James Bouknight74C-D+B+B+
Avery Bradley81D-AAB+
Malcolm Brogdon74AD+AC
Bruce Brown81B-BB+A-
Jalen Brunson85C+AAB+
Jared Butler72A-C+C+C
Facundo Campazzo74DBBB
Jevon Carter78C+C-AB+
Alex Caruso73C+C-B-B+
Chris Chiozza73A+D-BB
Josh Christopher75B-CBB-
Jordan Clarkson78C+BB+B
Darren Collison80B-D+A+A
Mike Conley75DD+A-A
Seth Curry85AC-A+A
Stephen Curry91AA-A+A
Johnny Davis74A-D-AB
Terence Davis76CB-B+B-
Spender Dinwiddie76C-B-B+B
Donte Divincenzo74D+BB-B
Luka Doncic83C-CA+A+
Luguentz Dort69A+C+B-D
Ayo Dosunmu83C-BAA
Anthony Edwards79B+C-A-B+
Carsen Edwards77C+C+A-B
Wayne Ellington82BA-B+B+
Derek Fisher82A+C-A+A-
Malachi Flynn77A-CA-C+
Bryn Forbes80CB-AA-
De'Aaron Fox83C-A+A-B+
Steve Francis78B+D+AA-
Tim Frazier72B-C-B-C+
Markelle Fultz72A-C+B+D+
Darius Garland85D-A+A+A
Shai Gilgeous Alexander82B+B+B+B+
Brandon Goodwin72A+DBC
Eric Gordon76D-C+AB+
Devonte Graham71B+CB+D+
Jalen Green78B-CB+A-
Quentin Grimes75BD-AB+
Kyle Guy81C+B-A+B+
Tyrese Haliburton82D-CA+A+
RJ Hampton80B+C+A-B+
Penny Hardaway83CC+A+A+
James Harden84C+A+A-A-
Gary Harris74C-D+B+A-
Killian Hayes68B+D+B-C-
Tyler Herro81C+C+AA-
Buddy Hield83D+A-A-A
Haywood Highsmith71A+DB-C
George Hill76D+C+B+B+
Aaron Holiday79D-BA-A
Jrue Holiday83D-A-A+A+
Talen Horton Tucker73CB-BC+
Nashon Hyland81C+BA-B+
Kyrie Irving84B-CA+A+
Allen Iverson84ACA+A-
Jaden Ivey76D+B-BB
Frank Jackson80CB+A-B+
Reggie Jackson76CBB-B
Ty Jerome74AD+AC
Isaiah Joe78AB-BB
Keon Johnson73C+C-B-B
Tyler Johnson81D+A-A-A-
Tre Jones73B+CB-C
Tyus Jones80B-C-AA-
Cory Joseph74C+DB+A-
Steve Kerr87A-B+A+A
Jason Kidd84B-B+A-A
Zach Lavine81C+C+A-A
Damion Lee73C-C+BB-
Saben Lee64BCC+D-
Kira Lewis60A-D-B-D-
Damian Lillard85C-B+A+A+
Kyle Lowry80C+BAB-
Theo Maledon73A-C-BC+
Terance Mann78A-A+BC-
Tre Mann76D+C-B+A
Wesley Matthews76D+A-B-B-
Tyrese Maxey80A-C-AA-
Skylar Mays76B-DA-A
Miles Mcbride73B+DBB
CJ McCollum85C-B+AA+
TJ McConnell78B-B+BB-
Jordan McLaughlin72AC-B+C-
Ben McLemore78BC-A+B
De'Anthony Melton70A-CB-D+
Patrick Mills78A-C-B+B+
Shake Milton76C-BB-B
Davion Mitchell76C-BB+B
Donovan Mitchell84BBAA-
Malik Monk78C-BB+B+
Ja Morant82C-AAB+
Monte Morris81CD+A+A
Mychal Mulder73C+A-BD+
Dejounte Murray81B+C+A-A-
Jamal Murray76B-D-A+B+
Steve Nash85BC-A+A+
Raul Neto74CFA+A+
Jaylen Nowell75C+DAB+
Frank Ntilikina78CDA-A+
Kendrick Nunn86C-A+AB+
Josh Okogie69B-DBC
Victor Oladipo76D+C+A-B+
Chris Paul82AC-AA-
Cameron Payne77A+D-A+A-
Elfrid Payton73C-C+BB-
Gary Payton II75CCBB+
Jordan Poole80DB-AA
Kevin Porter Jr76B-AB+C-
Norman Powell79AD-A+A-
Jason Preston71A-DBC+
Joshua Primo76B+A-BC-
Payton Pritchard78B+DAA
Immanuel Quickley76C-ABC
Jahmi'us Ramsey73B-C-BC+
Austin Rivers67CC-A-D
Oscar Robertson88B+B-A+A+
Nate Robinson65BD-BC-
Rajon Rondo78D+BB+B+
Derrick Rose77BBBC+
Terry Rozier82AC+AB+
D'Angelo Russell77B-D+A-A-
Tomas Satoransky81B+A-B+B
Dennis Schroder74C+D-B+A
Collin Sexton71B+FAB
Landry Shamet78A-C+B+B-
Anfernee Simons83BC+A-A+
Marcus Smart74A-C+BC
Dennis Smith Jr72B+C-B+C
Ish Smith83ACAA-
Jaden Springer79A-B+B-B-
John Stockton86CB-A+A
Jae'Sean Tate73C-ABC-
Tyrell Terry77BC-A-B
Cam Thomas75AD+AC
Isaiah Thomas79A+CB+B
Matt Thomas81A+DAA-
Fred VanVleet82CB-AA
Gabe Vincent79C+CA-A-
Dwyane Wade82BC-A+A
Lonnie Walker IV74B+D+BB
John Wall74AB+B-D+
TyTy Washington 76D+C-AB+
Quinndary Washington75A-CBB-
Blake Wesley73CC-BB
Jerry West89C+B+A+A+
Russell Westbrook70AC-BD
Coby White82C-AA-B+
Derrick White73CCB+C
Jason Williams79D+C+A-A
Louis Williams79BBB+B-
Mark Williams43D+C-FF
Cassius Winston78C+CBA
Delon Wright76Cc+B-A-
Trae Young87DA-A+A+
J. Cole78C+CB+A
Dan Rue77A-D+B+A-

NBA 2K22 Badges

Finishing Badges

To view the descriptions of each Finishing badge, please click here.

  • Acrobat
  • Backdown Punisher
  • Dream Shake
  • Dropstepper
  • Fast Twitch
  • Fearless Finisher
  • Giant Slayer
  • Grace under Pressure
  • Hook Specialist
  • Limitless Takeoff
  • Lob City Finisher
  • Mouse in the House
  • Post Spin Technician
  • Posterizer
  • Pro Touch
  • Putback Boss
  • Rise Up
  • Slithery Finisher
  • Tear Dropper
  • Unstrippable

Shooting Badges

To view a complete description of each shooting badge, please click here.

  • Blinders
  • Catch and Shoot
  • Chef
  • Circus Threes
  • Clutch Shooter
  • Corner Specialist
  • Deadeye
  • Difficult Shots
  • Fade Ace
  • Green Machine
  • Hot Zone Hunter
  • Limitless Spot-Up
  • Lucky #7
  • Mismatch Expert
  • Rhythm Shooter
  • Set Shooter
  • Slippery Off-Ball
  • Sniper
  • Stop & Pop
  • Volume Shooter

Playmaking Badges

To view the complete description of each playmaking badge, please click here.

  • Ankle Breaker
  • Bail Out
  • Break Starter
  • Bullet Passer
  • Dimer
  • Downhil
  • Floor General
  • Glue Hands
  • Handles for Days
  • Hyperdrive
  • Needle Threader
  • Post Playmaker
  • Quick Chain
  • Quick First Step
  • Space Creator
  • Special Delivery
  • Stop & Go
  • Tight Handles
  • Triple Threat Juke
  • Unpluckable

Defensive Badges

To view the complete guide to the 2K22 defensive badges, please click here.

  • Ankle Braces
  • Ball Stripper
  • Box
  • Brick Wall
  • Chase Down Artist
  • Clamps
  • Defensive Leader
  • Heart Crusher
  • Hustler
  • Interceptor
  • Intimidator
  • Menace
  • Off-Ball Pest
  • Pick Dodger
  • Pick Pocket
  • Pogo Stick
  • Post Lockdown
  • Rebound Chaser
  • Rim Protector
  • Tireless Defender
  • Worm

NBA 2K23 Dunking Controls

NBA 2K23 adds in a bevy of new controls to give you more control over how your player dunks the ball. In this post, we break down all the controls you’ll need to know to master dunking in 2K23.

Note: All of these controls trigger when you are holding down the sprint button (right trigger) when heading to the basket, and you only need to time certain dunks:

  • Two-Hand Dunk: Up on the Right Stick
  • Strong /Dominant Hand: Right on the Right Stick
  • Weak/Non-Dominant Hand: Left on the Right Stick
  • Rim Hang: Down on the Right Stick
  • Flashy Two-Hand: Up-Up on the Right Stick
  • Normal Skill Dunk with Meter: Up-Down on the Right Stick
  • Rim Hang Skill Dunk with Meter: Down-Down on Right Stick

We will have to see which animations are included within each category, but it seems like the safe and simple Two-Hand Dunks are going to reign supreme in 2K23.

MyTeam Season 8 Preview

Season 8 in NBA 2K22 is now upon us, and the following updates were made to the MyTeam game mode, starting with the rewards cards:

  • Level 40 Reward: Endgame C/PG Nikola Jokic
  • “Best Of” Domination Reward: Endgame PG/SG James Harden
  • Unlimited Galaxy Opal Tier: Invincible SF/SG Grant Hill
  • TTO: Invincible PG/SG Pete Maravich
  • 2,000 Triple Threat Wins: Invincible SG/SF Dominique Wilkins
  • Triple Threat Vault: Invincible SG/SF Elgin Baylor
  • Ascension: Invincible C/PF Darryl Dawkins
  • Draft: Invincible PG/SG Jerry West
  • DM Token Reward Market – Invincible SG/SF Julius Erving
  • Level 1 Reward: Invincible PG/SG Isiah Thomas

Some other big changes for this season of MyTeam:

  • 20 Anniversary cards are being released throughout the season that will feature Dark Matter cards with card art from past MyTeam games, with a collection reward of an Endgame option pack.
  • A collection of over a dozen of Kobe Bryant and Shaquille O’Neal cards will be released throughout the season with card art from past games. They will be Dark Matter cards.

Best Badges to Have on Bronze in Each Category

Many badges are most effective when on Hall of Fame, as they should. But some badges work so well on Bronze that you do not need to spend a lot of your precious points on them.

The following badges are extremely effective for a low cost, allowing you to focus on the more important badges while still having a well-rounded style of play.

Best Bronze Shooting Badges

Corner Specialist: Although this badge should be maxed out for corner spot-ups, other catch and shoot players would find it most helpful on Bronze. That way, you still get a slight boost when you find yourself in the corner, but can spend more badge points on Catch and Shoot or other badges.

Comeback Kid: A badge that will be slept on, but works so well. When you’re losing, this badge gives you some great shooting boosts that help you shot your team back into the game.

Clutch Shooter: Although this badge is great if you can max it out, there are far more important badges your player needs. But on Bronze, Clutch Shooter will give you that little extra boost that can help you in clutch situations.

Deadeye: In many cases, Blinders is the better badge to mitigate shot contests. Therefore, you may not have too many points for Deadeye. But on Bronze, Deadeye will give you the slight boosts when a defender jumps in your face.

Best Bronze Defensive Badges

Chase Down Artist: Chase down blocks are overpowered this year, but you don’t need a high Chase Down Artist badge to get them. While on Bronze, when combined with Rim Protector, you will also be able to get the OP chase down blocks that can change games.

Interceptor: Most guards and wings should have this on a higher level, but big men typically need to prioritize other badges. But big men should have Interceptor on Bronze, as it will allow them to stop passes at a good enough rate to affect games.

Anchor: Big men should have this maxed, but most guards and wings may not think about this badge. However, you get a badge that will unlock the ability to get blocks when you’re forced to guard the paint.

Best Bronze Playmaking Badges

Bail Out: It’s never really worth having Bail Out on a higher level, but almost every shooter should have it on Bronze. At this level, you will be able to pass out of most shots and get key assists to teammates.

Needle Threader: It is not super effective on Bronze for 5v5 games, but Needle Threader can be an effective low level badge to help you turn the ball over less in 2v2 and 3v3 games.

Vice Grip: Spamming the steal button after a rebound is one of the most frustrating part of NBA 2K, but this badge decreases the chances of a turnover. It’s cheap for many players and works OK.

Best Bronze Finishing Badges

Aerial Wizard: Although dunks are a bit difficult this year, this badge on Bronze will unlock the ability to convert the wide majority of your lobs. It is rarely worth it to have this badge on higher levels.

Pro Touch: Timing can be a bit difficult to master on dunks and layups, but this badge will give you a boost if you are able to somewhat time your layups. On Bronze, this will give you enough of a boost to convert many more inside shots.

Playmaking Badges Tier List

S Tier- Necessary for Most Players

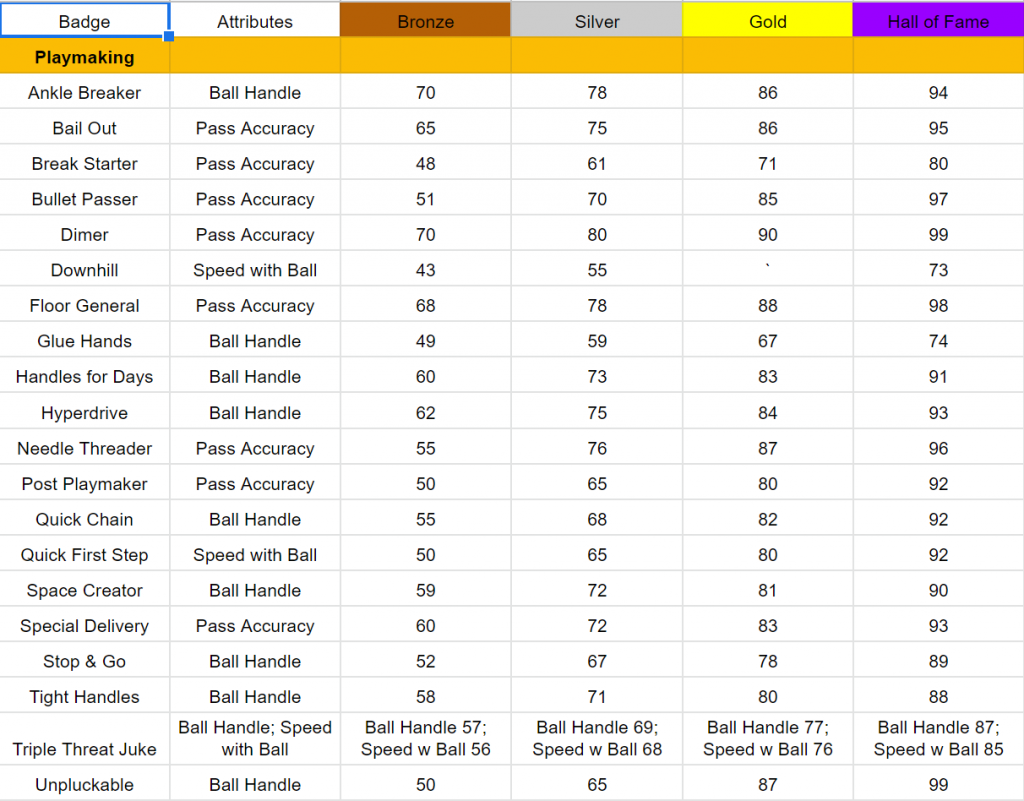
Quick First Step: A necessary for any player who will have the ball in their hands, as it allows you to actually move with some urgency with the ball. Should be maxed for most players, perhaps besides big men.

Bullet Passer: Another necessary for the wide majority of players, as Bullet Passer helps you combat the crazy steal animations in this year’s game. Every player should have it, and main ball handlers should think about maxing it.

Handles for Days: This badge needs to be maxed out for ball handlers, or else you won’t be able to do more than a few dribble moves. It’s not necessary out of ball handlers, but it is literally the most important dribbling badge.

Quick Chain: Another necessary badge for dribbling builds, as it will help you quickly transition between dribble moves.

A Tier – Great Badges for Some Builds

Glue Hands: Many scoff at this badge, but playing MyTeam has shown that this badge will help you get great catch animations before shots. You don’t need to max it out, but it works great on even Bronze or Silver.

Hyperdrive: This badge is better for slashing to the hoop, but Hyperdrive helps you speed up individual dribble moves to fool defenders. We recommend it for dribbling moves, but not before Quick Chain.

Tight Handles: Yet another dribbling badge that ball handlers need, as Tight Handles will stun your defender and allow you to get open shots either in the paint or behind the 3pt line.

Unpluckable: An underwhelming badge that most players at least need on Bronze. While we question its ability on higher levels, it necessity puts it on the A Tier level.

B Tier – Good Badges if You Have Extra Points

Dimer: Dimer is one of the most powerful badges in the game, but is really only needed if you have lower rated shooters on your team. Other badges are more necessary, but Dimer can be super powerful in the right situation.

Space Creator: A great badge combined with the Damian Lillard step back dribble move, but the step back is far from the best dribble move available.

Needle Threader: A Rec badge that can counter Interceptor, but is probably best used on Bronze or Silver with your extra badge points. It’s not OP, but it can help you avoid stupid steal animations every once in a while.

Bail Out: Another badge most players should have on Bronze to allow them to pass out of bad shots. It’s not worth having on higher levels, but even Bronze Bail Out will save you countless times.

C Tier – Decent Badges but Limited Usage

Floor General: Like Dimer, Floor General can be helpful in the right situation. However, it is not more powerful than any of the other badges, and should be reserved for those with a ton of playmaking badge points.

Ankle Breaker: This badge can be useful if you chase ankle breakers, but it activates too little to devote serious badge points to it. Tight Handles and Space Creator usually do more to break down your defender.

Stop & Go: Some claim this badge is OP, but we don’t notice much of a speed boost out of quick stops and other stops.

Downhill: With how OP chase down blocks are and also how speed is still unbalanced, Downhill really has limited uses for most builds. It can be helpful in some cases, though, but we don’t recommend it.

D Tier – Avoid These Badges

Post Playmaker: Post Playmaker can work if you mimic Nikola Jokic’s game in 2K22, but given how rare that is, this badge should mostly be avoided.

Triple Threat Juke: We have yet to see consistent results with this badge, and the Triple Threat is still not a great move against anyone but the computer, so we would stay away from this badge.

Break Starter: Full-court passes are still to easy without this badge, so while it may be helpful for rebounding big men on the Bronze level, it is still far from being necessary.

Special Delivery: With how hard lobs are this year, any badge involving them has lost a ton of value. This means Special Delivery, which helps throw lobs, will not see much use outside of players who know how to throw and catch lobs.

Defensive Badges Tier List

S Tier- Necessary

Intimidator: The only badge we recommend to max out for every player, as it helps you defend shots on both the perimeter and in the paint.

Clamps: A necessity to max out for perimeter defenders, as it will help you stop opposing players from getting past you for easy buckets.

Interceptor: Playing passing lanes is overpowered this year, and Interceptor will help you get some crazy steal animations on passes. While every player should have this badge, we only recommend maxing it out for defensive-focused players.

Rim Protector: A necessary badge for every player, but especially needs to be maxed out for big men. Will give you the fire power to block shots and be a top-tier paint defender.

A Tier – Necessary for Some Builds

Rebound Chaser/Box: Both necessary badges for big men, as you won’t be able to get rebounds without both badges. Although big men will need to max Rebound Chaser, Box can typically be equipped one level below Rebound Chaser.

Chase Down Artist: Chase downs are way too OP this year, but you can take advantage of this with Chase Down Artist. You will get some crazy block animations and get some key stops on defense.

Ankle Braces: A good badge to counter the crazy number of dribbling badges this year. It’s only necessary for on-ball defenders, and should be on a higher level in most cases.

Brick Wall: Necessary for builds that set screens, but otherwise useless. Big Men should realistically be the only ones with this badge.

B Tier – Great for Extra Badge Points

Ball Stripper: No one should realistically have this badge on higher levels, but it is great to have on lower levels to get the occasional steal when an opposing player tries to dunk on you.

Pogo Stick: A great badge if you sit paint or defend the rim, and should be close to maxed out in those instances. But otherwise your badge points are better spent elsewhere.

Pick Dodger: Another perimeter defender-specific build, but it is always underwhelming. Honestly it’s probably a good idea to have it, but we are still under the impression there are better ways to defend around picks.

C Tier – OK for Specific Builds

Pick Pocket: Although a bit better this year, you still get too many fouls when trying to use Pick Pocket on-ball. Though it has its uses, we can’t really recommend it for any players at this point.

Menace: This badge looked promising at the beginning of the year, but we have yet to really see it have a noticeable effect in-game. It claims to help you defend on-ball, but we haven’t seen this work in reality.

Tireless Defender: While it does help with your player’s stamina in a game, Park players and even most Rec/Pro-Am players won’t need this badge.

Post Lockdown: While we have seen instances of this badge working very well, it has not been consistent enough in a longer time period to be recommended for most players.

D Tier – Too Specific

Worm: Worm animations can be crazy and help you get some crazy rebounds, but it does not work enough and honestly most players are not good at activating the badge.

Hustler: A good badge to have on MyTeam players, but it isn’t worth having on your player for MyCareer or the online modes.

Defensive Leader: The boosts it gives teammates is nice, but boosts to defensive stats do not have the same effects as boosts to offensive stats. It’s not worth it for most teams.

Off-Ball Pest: Despite claims it helps on Pick and Rolls, Off-Ball Pest is not a strong enough badges when guarding off-ball to justify using badge points.

Finishing Badges Tier List

This table summarizes which badges fall into Tier 3 (the top and most expensive Tier), Tier 2, and Tier 1 (the lowest and most inexpensive Tier). Please use the search function above the table to find out the badge information for a given height.

HeightTier 3Tier 2Tier 1
6'0"
Bully
Posterizer
Slithery
Limitless Takeoff
Acrobat
Fast Twitch
Pro Touch
Fearless Finisher
Aerial Wizard
Backdown Punisher
Dream Shake
Dropstepper
Giant Slayer
Masher
Post Spin Technician
Rise Up
6'1"Bully
Posterizer
Slithery
Limitless Takeoff
Acrobat
Fast Twitch
Pro Touch
Fearless Finisher
Aerial Wizard
Backdown Punisher
Dream Shake
Dropstepper
Giant Slayer
Masher
Post Spin Technician
Rise Up
6'2"Bully
Posterizer
Slithery
Limitless Takeoff
Acrobat
Fast Twitch
Pro Touch
Fearless Finisher
Aerial Wizard
Backdown Punisher
Dream Shake
Dropstepper
Giant Slayer
Masher
Post Spin Technician
Rise Up
6'3"Bully
Posterizer
Slithery
Limitless Takeoff
Acrobat
Fast Twitch
Pro Touch
Fearless Finisher
Aerial Wizard
Backdown Punisher
Dream Shake
Dropstepper
Giant Slayer
Masher
Post Spin Technician
Rise Up
6'4"Bully
Posterizer
Slithery
Limitless Takeoff
Acrobat
Fast Twitch
Pro Touch
Fearless Finisher
Aerial Wizard
Backdown Punisher
Dream Shake
Dropstepper
Giant Slayer
Masher
Post Spin Technician
Rise Up
6'5"Bully
Posterizer
Slithery
Limitless Takeoff
Acrobat
Fast Twitch
Pro Touch
Fearless Finisher
Aerial Wizard
Backdown Punisher
Dream Shake
Dropstepper
Giant Slayer
Masher
Post Spin Technician
Rise Up
6'6"Bully
Posterizer
Slithery
Limitless Takeoff
Aerial Wizard
Masher
Fast Twitch
Fearless Finisher
Acrobat
Backdown Punisher
Dream Shake
Dropstepper
Giant Slayer
Pro Touch
Post Spin Technician
Rise Up
6'7"Bully
Posterizer
Slithery
Limitless Takeoff
Aerial Wizard
Masher
Fast Twitch
Fearless Finisher
Acrobat
Backdown Punisher
Dream Shake
Dropstepper
Giant Slayer
Pro Touch
Post Spin Technician
Rise Up
6'8"Bully
Posterizer
Slithery
Limitless Takeoff
Aerial Wizard
Masher
Fast Twitch
Fearless Finisher
Acrobat
Backdown Punisher
Dream Shake
Dropstepper
Giant Slayer
Pro Touch
Post Spin Technician
Rise Up
6'9"Bully
Posterizer
Fast Twitch
Rise Up
Aerial Wizard
Masher
Limitless Takeoff
Fearless Finisher
Acrobat
Backdown Punisher
Dream Shake
Dropstepper
Giant Slayer
Pro Touch
Post Spin Technician
Slithery
6'10"Bully
Posterizer
Fast Twitch
Rise Up
Aerial Wizard
Masher
Limitless Takeoff
Fearless Finisher
Acrobat
Backdown Punisher
Dream Shake
Dropstepper
Giant Slayer
Pro Touch
Post Spin Technician
Slithery
6'11"Bully
Masher
Fast Twitch
Rise Up
Aerial Wizard
Posterizer
Backdown Punisher
Fearless Finisher
Acrobat
Limitless Takeoff
Dream Shake
Dropstepper
Giant Slayer
Pro Touch
Post Spin Technician
Slithery
7'0"Bully
Masher
Fast Twitch
Rise Up
Aerial Wizard
Posterizer
Backdown Punisher
Dropstepper
Acrobat
Limitless Takeoff
Dream Shake
Fearless Finisher
Giant Slayer
Pro Touch
Post Spin Technician
Slithery
7'1"Bully
Masher
Fast Twitch
Rise Up
Aerial Wizard
Posterizer
Backdown Punisher
Dropstepper
Acrobat
Limitless Takeoff
Dream Shake
Fearless Finisher
Giant Slayer
Pro Touch
Post Spin Technician
Slithery
7'2"Bully
Masher
Fast Twitch
Rise Up
Aerial Wizard
Posterizer
Backdown Punisher
Dropstepper
Acrobat
Limitless Takeoff
Dream Shake
Fearless Finisher
Giant Slayer
Pro Touch
Post Spin Technician
Slithery
7'3"Bully
Masher
Fast Twitch
Rise Up
Aerial Wizard
Posterizer
Backdown Punisher
Dropstepper
Acrobat
Limitless Takeoff
Dream Shake
Fearless Finisher
Giant Slayer
Pro Touch
Post Spin Technician
Slithery