Category: NBA 2K23 Badges

Guide to Shooting Badges – Here
Guide to Finishing Badges – Here
Guide to Defensive Badges – Here
Guide to Playmaking Badges – Here

What are Core Badges?

Core badges are a new part of the NBA 2K23 badge system that allows you to equip top-tier badges without using badge points. In this post we break down the specifics of this new system and how you can benefit from it.

Quick Breakdown of the Badge System

As of now, the badge system is broken into three tiers for each badge category – Tier 1, 2, and 3. Tier 3 badges are considered the best, while Tier 1 badges are considered the worst. These tiers are dependent on height.

Tier 1 badges cost 1-2-3-4 badge points from Bronze to Hall of Fame, Tier 2 badges cost 3-4-5-6 from Bronze to HOF, and Tier 3 badges require 5-6-7-8 badge points from Bronze to HOF.

You must also equip 10 badge points from Tiers 1 and 2 (the two lowest) before equipping a Tier 3 badge. Thus, you would need at least 18 badge points to get a Tier 3 HOF badge.

How a Core Badge Fits into this System

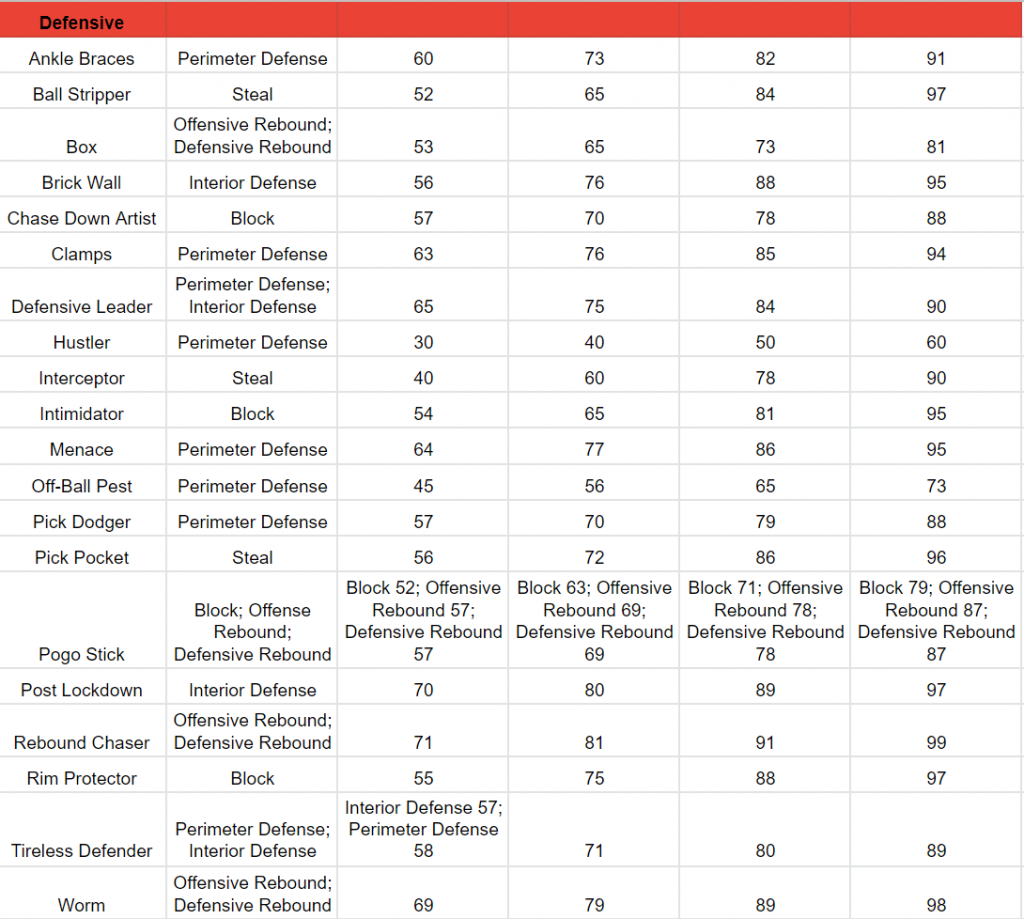
Once you equip your first Tier 3 badge, a ‘Core Challenge’ will start. These challenges are dependent on the badge, for example, the Core Challenge for Rebound Chaser would be focused on grabbing rebounds.

Once you complete the Core Challenge, you can equip the badge as a “Core Badge,” and the cost of the badge does not count against your badge points. This means that, if you have 18 badge points, you can have one HOF Tier 3 Core badge and another HOF Tier 3 badge.

You get one Core badge per category (Finishing, Shooting, so on), which can be from any tier. Of course, you will want most of them to be from Tier 3, but sometimes you may have to settle for a lesser badge.

The Core badge system is a great idea in that badges are very expensive this year, and this allows you to, at least, get another important badge at no cost. And the progress on any level, say from Bronze, carries over to higher levels as you unlock them.

Which Badges should I make my Core Badges

Obviously this depends on your position and how you play, but here are our recommendations for each position on which are the best badges to make your Core badges:

Guards

  • Finishing: Posterizer or Limitless Takeoff
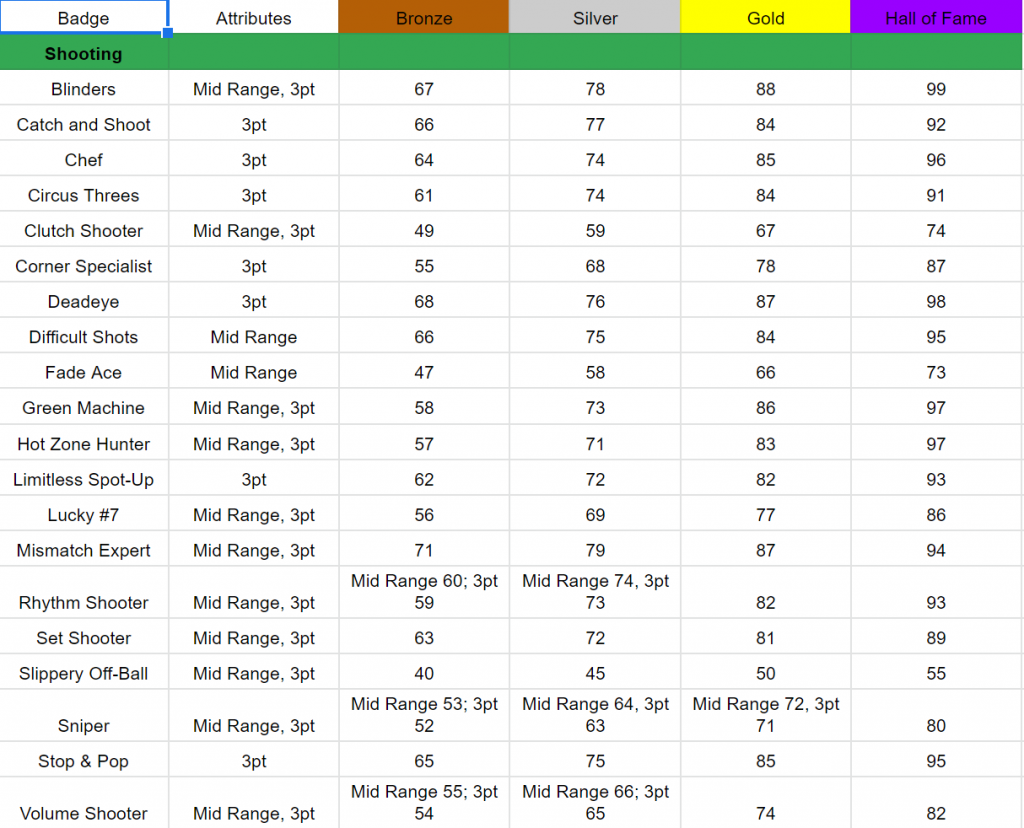
  • Shooting: Limitless Range
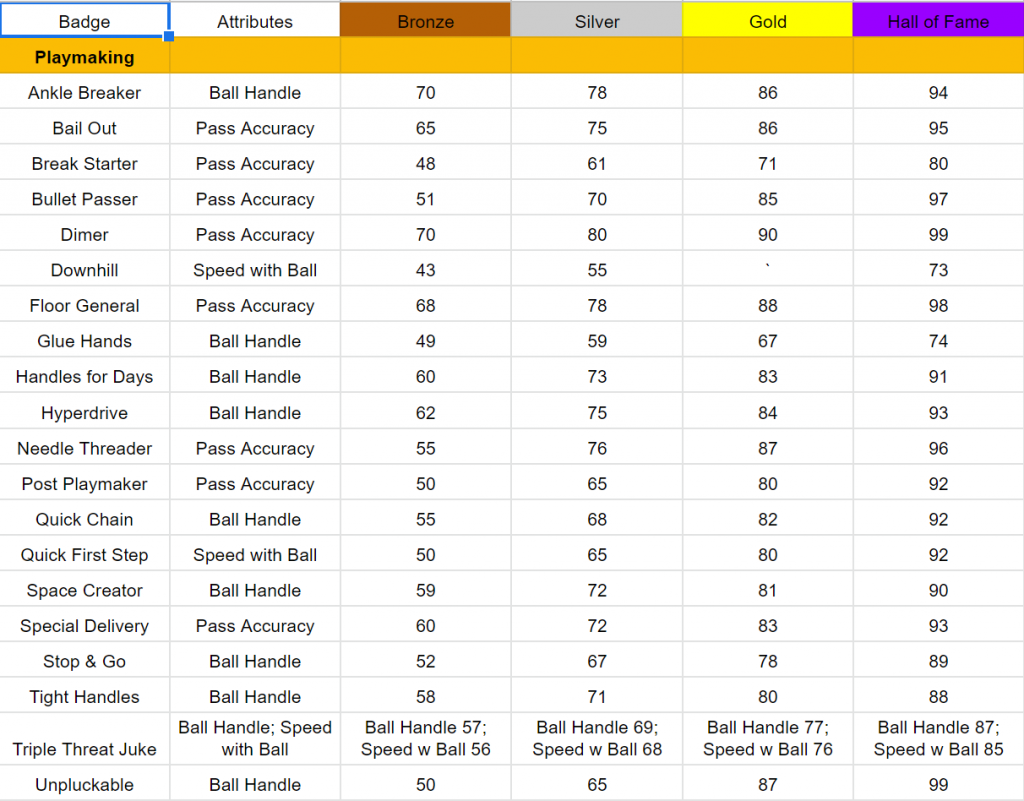
  • Playmaking: Killer Combos or Handles for Days
  • Defense: Clamps

Swings

  • Finishing: Posterizer or Limitless Takeoff
  • Shooting: Catch and Shoot
  • Playmaking: Clamp Breaker
  • Defense: Clamps

Big Men

  • Finishing: Bully
  • Shooting: Catch and Shoot
  • Playmaking: Break Starter
  • Defense: Anchor or Rebound Chaser

Best Badges to Have on Bronze in Each Category

Many badges are most effective when on Hall of Fame, as they should. But some badges work so well on Bronze that you do not need to spend a lot of your precious points on them.

The following badges are extremely effective for a low cost, allowing you to focus on the more important badges while still having a well-rounded style of play.

Best Bronze Shooting Badges

Corner Specialist: Although this badge should be maxed out for corner spot-ups, other catch and shoot players would find it most helpful on Bronze. That way, you still get a slight boost when you find yourself in the corner, but can spend more badge points on Catch and Shoot or other badges.

Comeback Kid: A badge that will be slept on, but works so well. When you’re losing, this badge gives you some great shooting boosts that help you shot your team back into the game.

Clutch Shooter: Although this badge is great if you can max it out, there are far more important badges your player needs. But on Bronze, Clutch Shooter will give you that little extra boost that can help you in clutch situations.

Deadeye: In many cases, Blinders is the better badge to mitigate shot contests. Therefore, you may not have too many points for Deadeye. But on Bronze, Deadeye will give you the slight boosts when a defender jumps in your face.

Best Bronze Defensive Badges

Chase Down Artist: Chase down blocks are overpowered this year, but you don’t need a high Chase Down Artist badge to get them. While on Bronze, when combined with Rim Protector, you will also be able to get the OP chase down blocks that can change games.

Interceptor: Most guards and wings should have this on a higher level, but big men typically need to prioritize other badges. But big men should have Interceptor on Bronze, as it will allow them to stop passes at a good enough rate to affect games.

Anchor: Big men should have this maxed, but most guards and wings may not think about this badge. However, you get a badge that will unlock the ability to get blocks when you’re forced to guard the paint.

Best Bronze Playmaking Badges

Bail Out: It’s never really worth having Bail Out on a higher level, but almost every shooter should have it on Bronze. At this level, you will be able to pass out of most shots and get key assists to teammates.

Needle Threader: It is not super effective on Bronze for 5v5 games, but Needle Threader can be an effective low level badge to help you turn the ball over less in 2v2 and 3v3 games.

Vice Grip: Spamming the steal button after a rebound is one of the most frustrating part of NBA 2K, but this badge decreases the chances of a turnover. It’s cheap for many players and works OK.

Best Bronze Finishing Badges

Aerial Wizard: Although dunks are a bit difficult this year, this badge on Bronze will unlock the ability to convert the wide majority of your lobs. It is rarely worth it to have this badge on higher levels.

Pro Touch: Timing can be a bit difficult to master on dunks and layups, but this badge will give you a boost if you are able to somewhat time your layups. On Bronze, this will give you enough of a boost to convert many more inside shots.

Playmaking Badges Tier List

S Tier- Necessary for Most Players

Quick First Step: A necessary for any player who will have the ball in their hands, as it allows you to actually move with some urgency with the ball. Should be maxed for most players, perhaps besides big men.

Bullet Passer: Another necessary for the wide majority of players, as Bullet Passer helps you combat the crazy steal animations in this year’s game. Every player should have it, and main ball handlers should think about maxing it.

Handles for Days: This badge needs to be maxed out for ball handlers, or else you won’t be able to do more than a few dribble moves. It’s not necessary out of ball handlers, but it is literally the most important dribbling badge.

Quick Chain: Another necessary badge for dribbling builds, as it will help you quickly transition between dribble moves.

A Tier – Great Badges for Some Builds

Glue Hands: Many scoff at this badge, but playing MyTeam has shown that this badge will help you get great catch animations before shots. You don’t need to max it out, but it works great on even Bronze or Silver.

Hyperdrive: This badge is better for slashing to the hoop, but Hyperdrive helps you speed up individual dribble moves to fool defenders. We recommend it for dribbling moves, but not before Quick Chain.

Tight Handles: Yet another dribbling badge that ball handlers need, as Tight Handles will stun your defender and allow you to get open shots either in the paint or behind the 3pt line.

Unpluckable: An underwhelming badge that most players at least need on Bronze. While we question its ability on higher levels, it necessity puts it on the A Tier level.

B Tier – Good Badges if You Have Extra Points

Dimer: Dimer is one of the most powerful badges in the game, but is really only needed if you have lower rated shooters on your team. Other badges are more necessary, but Dimer can be super powerful in the right situation.

Space Creator: A great badge combined with the Damian Lillard step back dribble move, but the step back is far from the best dribble move available.

Needle Threader: A Rec badge that can counter Interceptor, but is probably best used on Bronze or Silver with your extra badge points. It’s not OP, but it can help you avoid stupid steal animations every once in a while.

Bail Out: Another badge most players should have on Bronze to allow them to pass out of bad shots. It’s not worth having on higher levels, but even Bronze Bail Out will save you countless times.

C Tier – Decent Badges but Limited Usage

Floor General: Like Dimer, Floor General can be helpful in the right situation. However, it is not more powerful than any of the other badges, and should be reserved for those with a ton of playmaking badge points.

Ankle Breaker: This badge can be useful if you chase ankle breakers, but it activates too little to devote serious badge points to it. Tight Handles and Space Creator usually do more to break down your defender.

Stop & Go: Some claim this badge is OP, but we don’t notice much of a speed boost out of quick stops and other stops.

Downhill: With how OP chase down blocks are and also how speed is still unbalanced, Downhill really has limited uses for most builds. It can be helpful in some cases, though, but we don’t recommend it.

D Tier – Avoid These Badges

Post Playmaker: Post Playmaker can work if you mimic Nikola Jokic’s game in 2K22, but given how rare that is, this badge should mostly be avoided.

Triple Threat Juke: We have yet to see consistent results with this badge, and the Triple Threat is still not a great move against anyone but the computer, so we would stay away from this badge.

Break Starter: Full-court passes are still to easy without this badge, so while it may be helpful for rebounding big men on the Bronze level, it is still far from being necessary.

Special Delivery: With how hard lobs are this year, any badge involving them has lost a ton of value. This means Special Delivery, which helps throw lobs, will not see much use outside of players who know how to throw and catch lobs.

Defensive Badges Tier List

S Tier- Necessary

Intimidator: The only badge we recommend to max out for every player, as it helps you defend shots on both the perimeter and in the paint.

Clamps: A necessity to max out for perimeter defenders, as it will help you stop opposing players from getting past you for easy buckets.

Interceptor: Playing passing lanes is overpowered this year, and Interceptor will help you get some crazy steal animations on passes. While every player should have this badge, we only recommend maxing it out for defensive-focused players.

Rim Protector: A necessary badge for every player, but especially needs to be maxed out for big men. Will give you the fire power to block shots and be a top-tier paint defender.

A Tier – Necessary for Some Builds

Rebound Chaser/Box: Both necessary badges for big men, as you won’t be able to get rebounds without both badges. Although big men will need to max Rebound Chaser, Box can typically be equipped one level below Rebound Chaser.

Chase Down Artist: Chase downs are way too OP this year, but you can take advantage of this with Chase Down Artist. You will get some crazy block animations and get some key stops on defense.

Ankle Braces: A good badge to counter the crazy number of dribbling badges this year. It’s only necessary for on-ball defenders, and should be on a higher level in most cases.

Brick Wall: Necessary for builds that set screens, but otherwise useless. Big Men should realistically be the only ones with this badge.

B Tier – Great for Extra Badge Points

Ball Stripper: No one should realistically have this badge on higher levels, but it is great to have on lower levels to get the occasional steal when an opposing player tries to dunk on you.

Pogo Stick: A great badge if you sit paint or defend the rim, and should be close to maxed out in those instances. But otherwise your badge points are better spent elsewhere.

Pick Dodger: Another perimeter defender-specific build, but it is always underwhelming. Honestly it’s probably a good idea to have it, but we are still under the impression there are better ways to defend around picks.

C Tier – OK for Specific Builds

Pick Pocket: Although a bit better this year, you still get too many fouls when trying to use Pick Pocket on-ball. Though it has its uses, we can’t really recommend it for any players at this point.

Menace: This badge looked promising at the beginning of the year, but we have yet to really see it have a noticeable effect in-game. It claims to help you defend on-ball, but we haven’t seen this work in reality.

Tireless Defender: While it does help with your player’s stamina in a game, Park players and even most Rec/Pro-Am players won’t need this badge.

Post Lockdown: While we have seen instances of this badge working very well, it has not been consistent enough in a longer time period to be recommended for most players.

D Tier – Too Specific

Worm: Worm animations can be crazy and help you get some crazy rebounds, but it does not work enough and honestly most players are not good at activating the badge.

Hustler: A good badge to have on MyTeam players, but it isn’t worth having on your player for MyCareer or the online modes.

Defensive Leader: The boosts it gives teammates is nice, but boosts to defensive stats do not have the same effects as boosts to offensive stats. It’s not worth it for most teams.

Off-Ball Pest: Despite claims it helps on Pick and Rolls, Off-Ball Pest is not a strong enough badges when guarding off-ball to justify using badge points.

Finishing Badges Tier List

This table summarizes which badges fall into Tier 3 (the top and most expensive Tier), Tier 2, and Tier 1 (the lowest and most inexpensive Tier). Please use the search function above the table to find out the badge information for a given height.

HeightTier 3Tier 2Tier 1
6'0"
Bully
Posterizer
Slithery
Limitless Takeoff
Acrobat
Fast Twitch
Pro Touch
Fearless Finisher
Aerial Wizard
Backdown Punisher
Dream Shake
Dropstepper
Giant Slayer
Masher
Post Spin Technician
Rise Up
6'1"Bully
Posterizer
Slithery
Limitless Takeoff
Acrobat
Fast Twitch
Pro Touch
Fearless Finisher
Aerial Wizard
Backdown Punisher
Dream Shake
Dropstepper
Giant Slayer
Masher
Post Spin Technician
Rise Up
6'2"Bully
Posterizer
Slithery
Limitless Takeoff
Acrobat
Fast Twitch
Pro Touch
Fearless Finisher
Aerial Wizard
Backdown Punisher
Dream Shake
Dropstepper
Giant Slayer
Masher
Post Spin Technician
Rise Up
6'3"Bully
Posterizer
Slithery
Limitless Takeoff
Acrobat
Fast Twitch
Pro Touch
Fearless Finisher
Aerial Wizard
Backdown Punisher
Dream Shake
Dropstepper
Giant Slayer
Masher
Post Spin Technician
Rise Up
6'4"Bully
Posterizer
Slithery
Limitless Takeoff
Acrobat
Fast Twitch
Pro Touch
Fearless Finisher
Aerial Wizard
Backdown Punisher
Dream Shake
Dropstepper
Giant Slayer
Masher
Post Spin Technician
Rise Up
6'5"Bully
Posterizer
Slithery
Limitless Takeoff
Acrobat
Fast Twitch
Pro Touch
Fearless Finisher
Aerial Wizard
Backdown Punisher
Dream Shake
Dropstepper
Giant Slayer
Masher
Post Spin Technician
Rise Up
6'6"Bully
Posterizer
Slithery
Limitless Takeoff
Aerial Wizard
Masher
Fast Twitch
Fearless Finisher
Acrobat
Backdown Punisher
Dream Shake
Dropstepper
Giant Slayer
Pro Touch
Post Spin Technician
Rise Up
6'7"Bully
Posterizer
Slithery
Limitless Takeoff
Aerial Wizard
Masher
Fast Twitch
Fearless Finisher
Acrobat
Backdown Punisher
Dream Shake
Dropstepper
Giant Slayer
Pro Touch
Post Spin Technician
Rise Up
6'8"Bully
Posterizer
Slithery
Limitless Takeoff
Aerial Wizard
Masher
Fast Twitch
Fearless Finisher
Acrobat
Backdown Punisher
Dream Shake
Dropstepper
Giant Slayer
Pro Touch
Post Spin Technician
Rise Up
6'9"Bully
Posterizer
Fast Twitch
Rise Up
Aerial Wizard
Masher
Limitless Takeoff
Fearless Finisher
Acrobat
Backdown Punisher
Dream Shake
Dropstepper
Giant Slayer
Pro Touch
Post Spin Technician
Slithery
6'10"Bully
Posterizer
Fast Twitch
Rise Up
Aerial Wizard
Masher
Limitless Takeoff
Fearless Finisher
Acrobat
Backdown Punisher
Dream Shake
Dropstepper
Giant Slayer
Pro Touch
Post Spin Technician
Slithery
6'11"Bully
Masher
Fast Twitch
Rise Up
Aerial Wizard
Posterizer
Backdown Punisher
Fearless Finisher
Acrobat
Limitless Takeoff
Dream Shake
Dropstepper
Giant Slayer
Pro Touch
Post Spin Technician
Slithery
7'0"Bully
Masher
Fast Twitch
Rise Up
Aerial Wizard
Posterizer
Backdown Punisher
Dropstepper
Acrobat
Limitless Takeoff
Dream Shake
Fearless Finisher
Giant Slayer
Pro Touch
Post Spin Technician
Slithery
7'1"Bully
Masher
Fast Twitch
Rise Up
Aerial Wizard
Posterizer
Backdown Punisher
Dropstepper
Acrobat
Limitless Takeoff
Dream Shake
Fearless Finisher
Giant Slayer
Pro Touch
Post Spin Technician
Slithery
7'2"Bully
Masher
Fast Twitch
Rise Up
Aerial Wizard
Posterizer
Backdown Punisher
Dropstepper
Acrobat
Limitless Takeoff
Dream Shake
Fearless Finisher
Giant Slayer
Pro Touch
Post Spin Technician
Slithery
7'3"Bully
Masher
Fast Twitch
Rise Up
Aerial Wizard
Posterizer
Backdown Punisher
Dropstepper
Acrobat
Limitless Takeoff
Dream Shake
Fearless Finisher
Giant Slayer
Pro Touch
Post Spin Technician
Slithery

Shooting Badge Tier List

For NBA 2K23, each category of badges in broken down into three Tiers. These tiers, according to 2K, make players’ badge loadouts more unique than in past years. In this post we list the shooting badges, each Tier, and how many badge points are needed to equip each badge.

Tier 3 – The Highest Tier

Cost for each badge level:

  • Hall of Fame: 8 Points
  • Gold: 7 Points
  • Silver: 6 Points
  • Bronze: 5 Points

The Tier 3 Shooting Badges:

  • Deadeye (All Heights)
  • Limitless Range (All Heights)
  • Agent 3 (6″7″ and under)
  • Blinders (6’10” and under)
  • Catch & Shoot (6’8″ and over)
  • Corner Specialist (6’11” and over)

Tier 2 – The Middle Tier

Cost for Each Badge Level:

  • Hall of Fame: 6 Points
  • Gold: 5 Points
  • Silver: 4 Points
  • Bronze: 3 Points

Tier 2 Shooting Badges:

  • Amped (6’5″ and under)
  • Catch and Shoot (6’7″ and under)
  • Green Machine (All Heights)
  • Space Creator (6’7″ and under)
  • Agent 3 (6’8″-6’10”

Tier 1 – Important but Inexpensive Badges

Cost for Each Badge Level:

  • Hall of Fame: 4 Points
  • Gold: 3 Points
  • Silver: 2 Points
  • Bronze: 1 Points

Tier 1 Shooting Badges:

  • Claymore
  • Clutch Shooter
  • Comeback Kid
  • Corner Specialist
  • Guard Up
  • Middy Machine
  • Slippery Off-Ball
  • Volume Shooter

Coming Soon: The Ratings needed to unlock each level of each badge.

Attribute Requirements to Unlock Badges in NBA 2K22

NBA 2K22 Next-Gen expands on the idea of requiring attributes to unlock certain badges on your player. For example, you need a 94 Perimeter Defense to unlock Hall of Fame Clamps for your player.

In this post, we break down what attribute levels are needed to unlock each badge in NBA 2K22 Next-Gen. In addition, this link will bring you to a spreadsheet with the requirements for each badge type.

Jump to: Finishing | Shooting | Playmaking | Defense

Slashing

Shooting

Playmaking

Defense

Badge Conversions from Current Gen to Next Gen

If you look at our post on all the Shooting badges in both versions of NBA 2K21, you’ll notice there are several new badges in the Next Gen game.

And if you play MyTeam, there are specific conversions from the current gen game to the next gen game. Listed below are these conversions.

  • Showtime = Posterizer
  • Pick and Roller = Rise Up
  • Cross Key Scorer = Heat Seeker
  • Deep Hooks = Hooks Specialist
  • Relentless Finisher = Fearless Finisher
  • Fastbreak Finisher = Highlight Film
  • Flexible Release = Sniper
  • Pump Fake Maestro = Set Shooter
  • Deep Fades = Fade Ace
  • Steady Shooter = Blinders
  • Range Extender = Deep Threes
  • Hot Start = Hot Shot
  • Flashy Passer = Relay Passer
  • Lob City Passer = Special Delivery
  • Lightning Reflexes = Ankle Braces

Removed Badges:

  • Consistent Finisher
  • Contact Finisher
  • Fancy Footwork
  • Pick and Popper
  • Moving Truck

NBA 2K23 Badges

Below are all of the resources available on the badges in NBA 2K23, broken into the four categories: Finishing, Shooting, Playmaking, and Defense.

Finishing Badges

  • The Complete Guide to the NBA 2K23 Finishing Badges: The complete list of finishing badges in NBA 2K23 with descriptions and recommendations for each badge.
  • The Best Finishing Badges: A ranking of the best finishing badges to equip on your player to slash better in the paint.
  • The Best Tier 1 Finishing Badges (Coming Soon): A ranking of the best finishing badges in Tier 1.
  • The Best Tier 2 Finishing Badges (Coming Soon): A ranking of the best finishing badges in Tier 2.
  • The Best Tier 3 Finishing Badges (Coming Soon): A ranking of the best finishing badges in Tier 3.

Shooting Badges

  • The Complete Guide to Shooting Badges in NBA 2K23: The complete guide to the shooting badges in NBA 2K23, with descriptions and recommendations for each badge.
  • The Best Shooting Badges: A ranking of the best shooting badges to equip on your player to shoot better in every game mode.
  • The Top Shooting Badges in Tier 3 (Coming Soon): A ranking of the best shooting badges in Tier 1 to equip on your player.
  • The Top Shooting Badges in Tier 2 (Coming Soon): A ranking of the best shooting badges in Tier 2.
  • The Top Shooting Badges in Tier 3 (Coming Soon): A ranking of the best shooting badges in Tier 3.

Playmaking Badges

  • Ankle Breaker
  • Bail Out
  • Break Starter
  • Bullet Passer
  • Dimer
  • Downhil
  • Floor General
  • Glue Hands
  • Handles for Days
  • Hyperdrive
  • Needle Threader
  • Post Playmaker
  • Quick Chain
  • Quick First Step
  • Space Creator
  • Special Delivery
  • Stop & Go
  • Tight Handles
  • Triple Threat Juke
  • Unpluckable

Check out the Full guide to Playmaking badges here.

Defensive Badges

  • Ankle Braces
  • Ball Stripper
  • Box
  • Brick Wall
  • Chase Down Artist
  • Clamps
  • Defensive Leader
  • Heart Crusher
  • Hustler
  • Interceptor
  • Intimidator
  • Menace
  • Off-Ball Pest
  • Pick Dodger
  • Pick Pocket
  • Pogo Stick
  • Post Lockdown
  • Rebound Chaser
  • Rim Protector
  • Tireless Defender
  • Worm

Best Defensive Badges for Every Position

“Defense wins Championships” rings true in NBA 2K23. If your player clamps up your opponent, chances are you’re going to win most games in NBA 2K23.

And to play your best defense in the newest game, you’re going to need the help of the Best Defensive Badges for Guards in the game this year. We broke them into positions and tiers to best fit your player(s):

Skip to: Guards | Swings | Big Men

Guards

Guards are typically focused on perimeter defense, and these badge selections reflect this focus:

Tier 3

  1. Clamps: Guarding opposing guards is tougher with overpowered blowbys off stepbacks, but Clamps is going to be your best bet to stop opposing scorers.
  2. Challenger: Chances are, you’ll be guarding a lot of 3-point shots. Challenger is going to help amplify your contests and slow down opposing shooters.
  3. Glove: Some really like this badge, but on-ball steals are still pretty inconsistent in 2K23. If you have extra badge points, this may be worth throwing a few on.

Tier 2

  1. Pick Dodger: Screens are still extremely effective, and Pick Dodger is still underpowered. Nonetheless, you’re going to need this badge if you want to have any hope of getting around picks.
  2. Menace: This badge has not been great these past few years, but there aren’t too many great options in this tier.

Tier 1

  1. Chasedown Artist: This badge is far underpowered compared to last year, but with the dominant playstyle being rim-running, this badge will at least give you some hope.
  2. Anchor: This, again, is a counter to rim-running. You’re a small player, so don’t expect great results contesting in the paint, but this badge will give you a fighting chance.

Swings

Swing players, defined as 6’6″ to 6’9″, have to focus on both a bit of perimeter defense and interior defense. Here are the best defensive badges in each Tier for swings:

Tier 3

  1. Clamps: Again, this badge is going to help you stop ball handlers. Swing players will probably be helping on ball handlers frequently, so this is still the best defensive badge.
  2. Challenger: Whether you’re guarding an on-ball or off-ball shooter, Challenger is going to help you contest their jumpshots and stop a barrage of threes.
  3. Interceptor: Playing passing lanes is perhaps a swing player’s biggest contribution on defense, so Interceptor is a natural fit. You can play without it, but it makes getting steals so much easier.

Tier 2

  1. Chasedown Artist: Whether you’re playing on-ball or off-ball, this badge is going to help you guard again rim-running. Again, this badge pales to last year’s version, but still helps.
  2. Anchor: You’re a bit bigger than guards, so this interior defense badge is going to help a bit more. Whether you are on a guard, swing, or big man, this badge will help you guard the paint.

Tier 1

  1. Rebound Chaser: You won’t be the primary rebounder (hopefully), but having this badge on a lower level is going to allow you to help clean up the boards on long rebounds.
  2. Pick Dodger: You won’t face a ton of screens as a swing, but this badge will help you in the chance that you do. It’s still underwhelming, but it’s one of few good badges in Tier 1.

Big Men

Big Men are entirely focused on paint defense and rebounding, and this list of badges is going to help you maximize both skills and help you lead your defense to wins:

Tier 3

  1. Anchor: Interior defense is a bit odd this year without this badge, so big men should have it on the highest level they can afford. It’s a mix of Rim Protector and Intimidator from last year, so you can see why it’s so important.
  2. Rebound Chaser: You can get rebounds without this badge, but you are going to be out-boarded, without fail, by centers with this badge.
  3. Brick Wall: Screens are still an important part of 2K23, and this badge is going to help you set both stronger and more effective screens. ?It’s not necessary, but helpful after you equip the above badges.

Tier 2

  1. Boxout Beast: Unless you want opposing big men worming around your boxouts, this badge is going to be necessary. It’s pretty cheap and effective, so it’s a definite must for all big men.
  2. Chasedown Artist: This badge makes another appearance, and it’s just another tool for big men to guard the paint.

Tier 1

  1. Challenger: Regardless of your defensive scheme, you are going to be switched onto shooters at some point. This cheap badge is going to help you defend against those shots.
  2. Interceptor: Again, you’ll be playing the passing lanes at some point. This badge is going to maximize your chances of getting a steal if they throw it your way.

Check out our other guides on the best badges in each category: